Roadside diagnosis of a car electrical fault is the systematic testing of the battery, alternator, wiring, and individual components to identify the root cause without guessing. Knowing how car electrical fault diagnosed roadside works saves you from replacing the wrong part and spending money you did not need to spend. The process starts with two foundational checks: battery resting voltage and charging system voltage. A healthy battery reads around 12.6V with the engine off. A working charging system reads between 13.8V and 14.7V with the engine running. Those two numbers alone eliminate most guesswork before you touch anything else.
How to test the battery and charging system voltage at the roadside
Battery voltage testing is the first step in any roadside electrical troubleshooting sequence. You need a digital multimeter, which costs as little as $25–$30 and delivers accurate readings that cheap analog meters often miss. Set the meter to DC voltage, connect the red lead to the positive terminal and the black lead to the negative terminal, and read the result.
What battery voltage numbers tell you
A resting voltage below 12.4V means the battery is partially discharged. A reading below 12.0V points to a deeply discharged or failing battery. Neither number alone tells you whether the battery or the charging system is the problem. That distinction requires a second test with the engine running.
Start the engine and measure voltage at the same terminals. A charging voltage below 13.5V confirms alternator failure. A reading above 15V signals an overcharging fault, which damages the battery and electronics over time. The normal range sits between 13.8V and 14.7V.
- Resting voltage around 12.6V: battery is healthy
- Resting voltage below 12.0V: battery is deeply discharged or failing
- Charging voltage 13.8V–14.7V: alternator is working correctly
- Charging voltage below 13.5V: alternator is likely failing
- Charging voltage above 15V: voltage regulator or alternator fault
Pro Tip: Never replace the battery first if charging voltage is low. A new battery will drain just as fast if the alternator is not charging it. Test charging voltage before buying any parts.
You can also check for a failing alternator diode by switching your multimeter to AC voltage mode. AC ripple above 0.1V at around 2,000 RPM points to a bad diode inside the alternator. This test takes under two minutes and confirms whether the alternator needs replacement before you leave the roadside.
How do you identify parasitic battery drain at the roadside?
Parasitic drain is the electrical current your car draws from the battery when the engine is off and all accessories are shut down. A small draw is normal. Modules, clocks, and memory circuits need power to stay active. The problem starts when that draw is too high.
Normal parasitic draw stays below 50mA. A draw above 100mA is considered active drain and will kill a battery overnight. This explains why some drivers jump-start their car in the morning only to find it dead again the next day.
To test for parasitic drain at the roadside, follow these steps:
- Turn off the engine and all accessories. Close all doors and wait at least 10 minutes for modules to enter sleep mode.
- Set your multimeter to DC amperage (10A range to start).
- Disconnect the negative battery cable and connect the multimeter in series between the cable and the battery terminal.
- Read the current. Below 50mA is normal. Above 100mA requires further investigation.
- Begin pulling fuses one at a time from the fuse box while watching the meter. When the reading drops significantly, the circuit you just disconnected contains the fault.
- Reinstall that fuse, identify the components on that circuit, and inspect them individually.
| Draw Level | Reading | Meaning |
|---|---|---|
| Normal | Below 50mA | Modules sleeping correctly |
| Borderline | 50mA–100mA | Monitor; may cause slow discharge |
| Active drain | Above 100mA | Circuit fault; fuse pull test needed |
Common causes of excessive parasitic drain include modules that fail to enter sleep mode, stuck relays, and aftermarket accessories wired directly to always-on circuits. The fuse pull method isolates the circuit without any advanced equipment.
Pro Tip: Carry a clamp-style ammeter in your glove box if you drive long distances regularly. It reads current without breaking the circuit, which makes roadside drain testing faster and safer.
What wiring faults and shorts can you find with a multimeter?
Visual inspection comes before any meter test. Look at connectors, terminals, and the wiring harness for corrosion, melted insulation, cracked plastic, or loose pins. Corrosion at a battery terminal causes voltage drop that mimics a failing battery. A loose ground strap causes intermittent faults across multiple systems.
Once the visual check is done, a multimeter handles four key tests:
- Continuity: Confirms a wire is unbroken. Set the meter to continuity mode and probe both ends of the wire. A beep means the wire is intact.
- Resistance: Measures how much a wire or component resists current flow. High resistance in a ground wire causes voltage drop faults.
- Voltage drop under load: The most reliable test for wiring faults. Voltage drop should stay at 0.1V or less on a power feed or ground cable under load. Anything higher points to a high-resistance connection causing intermittent failures.
- Diode testing: Confirms one-way current flow in components like alternator diodes and check valves.
Voltage drop testing under load is more reliable than resistance testing on cold circuits. Cold resistance readings miss faults that only appear when the circuit carries real current at operating temperature.
- Connect the multimeter in voltage mode across the suspect wire or connection.
- Activate the circuit so it carries its normal operating load.
- Read the voltage drop. Above 0.1V on a ground or power feed requires repair.
- Move the probes along the circuit to narrow down the high-resistance point.
Intermittent faults are often triggered by heat or vibration. Wiggling a harness while monitoring voltage can reproduce the fault roadside and confirm which connector or section of wire is the problem.
Pro Tip: Back-probe connectors instead of piercing wires. Piercing insulation creates new entry points for moisture and corrosion that cause future faults.
To confirm whether the fault is in the device or the wiring, jump the device directly to the battery using jumper wires and alligator clips. If the device works when powered directly, the wiring or circuit is at fault. If it still fails, the device itself needs replacement.
What symptoms guide roadside electrical fault diagnosis?
Symptoms are the starting point for identifying roadside car faults before any meter touches a terminal. Each symptom narrows the list of likely causes and tells you where to begin testing.
Common symptoms and what they point to:
- Battery warning light: Charging system fault. Start with charging voltage test immediately.
- Dimming or flickering headlights: Alternator output dropping under load. Test charging voltage at idle and at 2,000 RPM.
- Slow cranking: Low battery voltage or high resistance in the starter circuit. Test resting voltage first.
- Repeated dead battery after jump starts: Parasitic drain or alternator not charging. Run both tests.
- Intermittent electrical failures: Wiring fault, loose connector, or failing relay. Visual inspection and voltage drop testing apply.
Multiple warning lights appearing at once usually indicate a single root cause, not multiple independent failures. A charging system fault drops voltage across the entire vehicle, triggering ABS, traction control, and engine warning lights simultaneously. A CAN bus communication fault produces a similar pattern.
Scanning fault codes is only the first diagnostic step. Warning lights confirm a system is affected, not which part failed. Verifying sensor readings and circuit integrity prevents unnecessary part replacement and keeps repair costs accurate.
Pro Tip: When multiple warning lights appear together, test charging voltage before scanning codes. A low-voltage condition creates false codes across every module and wastes diagnostic time.
Some faults are diagnosable roadside and some are not. A dead battery, a failed alternator, a blown fuse, or a corroded terminal are all fixable or at least identifiable without a shop. A failing body control module or a CAN bus fault requires a scan tool and wiring diagrams to trace properly.
What tools do you need for roadside electrical troubleshooting?
The right tools make the difference between a confirmed diagnosis and an expensive guess. You do not need a full scan tool to identify most roadside electrical faults.
Essential tools to keep in your car:
- Digital multimeter: The single most useful tool for diagnosing car electrical issues. A reliable unit in the $25–$30 range handles voltage, resistance, continuity, and diode testing.
- Test light: Quickly confirms whether a circuit has power without needing to read a number.
- Alligator clip leads: Allow hands-free connections during jump tests and voltage drop measurements.
- Jumper wires: Used to power devices directly from the battery to isolate device faults from wiring faults.
- Fuse puller: Removes fuses cleanly during parasitic drain testing without bending pins.
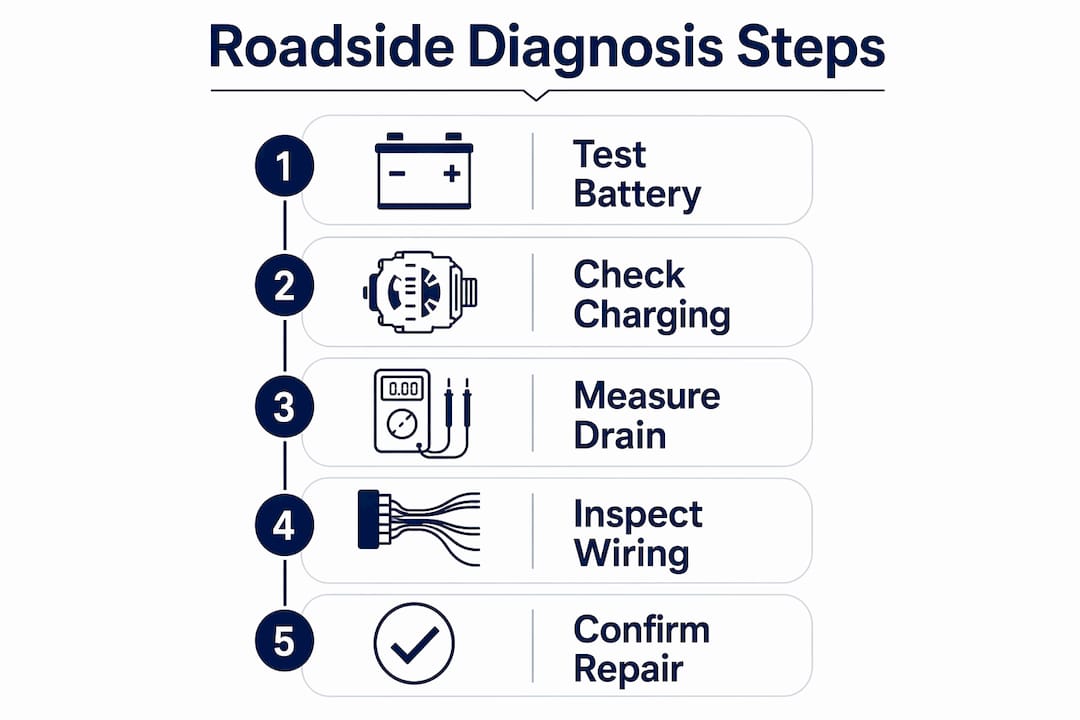
The systematic workflow for roadside electrical troubleshooting follows this order: test resting battery voltage, test charging voltage with the engine running, check for parasitic drain if the battery keeps dying, perform visual inspection of connectors and wiring, run voltage drop tests on suspect circuits, and confirm device health with a direct battery jump test.
Onsite Los Angeles Mobile Mechanic technicians carry mobile diagnostic tools that extend this workflow to include live data scanning and module communication checks. For most car owners, the multimeter-based approach above resolves the majority of roadside faults without waiting for a tow.

Pro Tip: Store a simplified wiring diagram for your vehicle on your phone. Most manufacturers publish them in the owner’s manual or service documentation. A diagram turns a confusing harness into a traceable map.
Document every test result, including the voltage readings, which fuses you pulled, and what changed. That record gives any mechanic a head start and prevents duplicate testing.
Key Takeaways
Roadside electrical diagnosis works by testing battery voltage, charging output, parasitic drain, and wiring in sequence to isolate the root cause before replacing any part.
| Point | Details |
|---|---|
| Test charging voltage first | Charging voltage between 13.8V and 14.7V confirms the alternator is working; below 13.5V means alternator failure. |
| Parasitic drain threshold | Normal draw stays below 50mA; above 100mA requires a fuse pull test to isolate the faulty circuit. |
| Voltage drop beats resistance | Test circuits under load, not cold; voltage drop above 0.1V on a power or ground cable signals a wiring fault. |
| Multiple lights, one cause | Simultaneous warning lights usually point to a single fault like a charging system failure or CAN bus error. |
| Jump test isolates the device | Powering a device directly from the battery confirms whether the fault is in the device or the vehicle wiring. |
What I have seen go wrong with roadside electrical diagnosis
The most common mistake I see is a driver replacing the battery because the car would not start, then calling again two weeks later with the same problem. The battery was never the issue. The alternator was not charging it. A two-minute voltage test with the engine running would have caught that immediately.
Intermittent faults are the hardest to diagnose roadside because the fault disappears when the trigger condition goes away. Heat and vibration cause most of them. The right move is to wiggle harnesses, tap connectors, and try to reproduce the symptom while monitoring voltage. Replacing parts without reproducing the fault is expensive guessing.
The other mistake I see regularly is treating a scan code as a confirmed diagnosis. A P0300 misfire code does not mean the ignition coil failed. It means the ECU detected a misfire. The coil, the injector, the spark plug, or a wiring fault could all cause that code. Verifying circuit integrity after reading a code is what separates an accurate diagnosis from a parts-swapping exercise.
Carry a decent multimeter. Learn the three core tests: resting voltage, charging voltage, and parasitic drain. Those three tests resolve the majority of electrical faults car owners encounter on the road. Everything else builds from that foundation.
— Aaron
Onsite Los Angeles Mobile Mechanic brings the diagnosis to you
Electrical faults do not wait for a convenient time to appear. When your car stops charging, your lights start flickering, or your battery dies for the third time this month, you need answers at the vehicle, not at a shop two days later.

Onsite Los Angeles Mobile Mechanic comes to your location anywhere in the greater Los Angeles area with professional diagnostic tools and the systematic approach described in this guide. The team handles battery testing, charging system diagnosis, parasitic drain testing, and wiring fault isolation on-site, with upfront pricing and no hidden fees. Many electrical repairs are completed within an hour. Call 213-583-4159 or visit the mobile mechanic services page to book your appointment. No tow truck required.
FAQ
What voltage should my battery show with the engine running?
A healthy charging system produces 13.8V to 14.7V at the battery terminals with the engine running. A reading below 13.5V indicates alternator failure.
How do I know if my car has a parasitic battery drain?
Connect a multimeter in series with the negative battery cable after the vehicle has sat for at least 10 minutes. A reading above 100mA confirms active parasitic drain requiring further diagnosis.
Can I diagnose a car electrical fault roadside without a scan tool?
A digital multimeter handles the majority of roadside electrical faults, including battery health, charging system output, parasitic drain, and wiring continuity, without a scan tool.
Why do multiple warning lights come on at the same time?
Multiple simultaneous warning lights usually point to one root cause, such as a charging system failure or a CAN bus communication fault, rather than several independent component failures.
What is the first test to run when diagnosing a roadside electrical fault?
Measure battery resting voltage with the engine off, then measure charging voltage with the engine running. These two readings identify whether the battery, the alternator, or the charging circuit is at fault.