A red or brown puddle under your car is not something to ignore and hope disappears. A transmission fluid leak needs attention now. If the puddle is fresh, bright red, and slippery, your transmission is actively losing fluid. If it’s dark brown and smells burnt, the fluid has been running hot and the damage may already be underway. Either way, the next step is the same: stop guessing and get it checked.
Here’s what to do right now:
- Park on level ground and slide a piece of white cardboard under the vehicle overnight to confirm the leak location and color.
- Check the fluid level if your vehicle has an accessible dipstick. Do this with the engine warm and the transmission in Park (or Neutral, per your owner’s manual).
- Note the color and smell. Fresh red or pink fluid with a slightly sweet smell is normal. Dark brown fluid with a burnt odor means the fluid is degraded and the transmission is stressed.
- Call a mechanic if fluid loss is fast, the level is low, or you notice any drivability problems.
Do not drive if you feel slipping between gears, delayed engagement when shifting into Drive or Reverse, a burning smell while moving, or if the fluid level is critically low. These are signs the transmission is already operating under stress, and every mile you drive risks turning a $300 repair into a $3,000 rebuild.
Pro Tip: Take a photo of the puddle and the dipstick reading before you wipe anything clean. That photo is the first thing a mechanic will want to see.

Key Takeaways
A transmission fluid leak caught early is almost always a straightforward, affordable repair. Left alone, it becomes one of the most expensive failures in automotive repair.
| Point | Details |
|---|---|
| Identify the fluid | Fresh transmission fluid is red or pink, thin, and slightly sweet-smelling; dark brown with a burnt odor means it’s degraded. |
| Know when to stop driving | Slipping, delayed engagement, burning smell, or critically low fluid means stop driving immediately. |
| Temporary measures have limits | Topping off buys time for a short move; stop-leak additives won’t fix mechanical failures like cracked pans or failed hard seals. |
| Repair costs scale with delay | External repairs like pan gaskets typically run $300 repair; ignored leaks that cause internal damage can reach $1,500–$4,000 or more. |
| Onsite Los Angeles Mobile Mechanic | Handles on-site transmission leak inspections and common external repairs across the greater Los Angeles area with upfront pricing. |
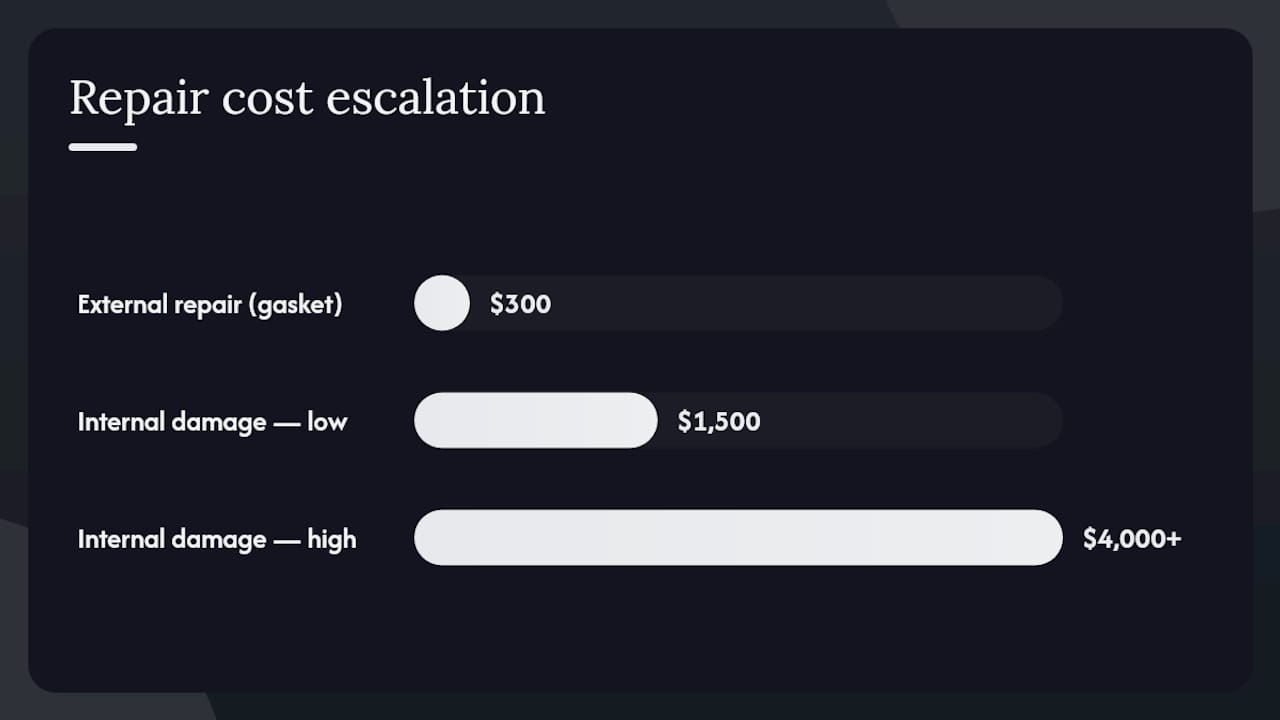
Table of Contents
- What transmission fluid actually looks like (and how to tell it apart)
- The most common transmission leak points and why they fail
- How mechanics diagnose leaks and what you can safely check at home
- Driving symptoms a transmission fluid leak causes and how problems progress
- Is it safe to drive with a transmission fluid leak?
- Repair options, typical costs, and what each job involves
- Temporary fixes and their real limitations
- How to reduce the risk of transmission leaks
- Signs the leak has become internal transmission damage
- When to call a professional and how a mobile mechanic can help
- What most car owners get wrong about transmission leaks
- Get your transmission leak diagnosed on-site in Los Angeles
- Sources
What transmission fluid actually looks like (and how to tell it apart)
Fresh transmission fluid is typically red or pink, translucent, and thinner than engine oil. It has a slightly sweet or petroleum smell when new. As it ages and heats up, it darkens to a reddish-brown, then to a deep brown, and eventually smells burnt. That color progression tells you a lot about how long the leak has been going on and how hard the transmission has been working.
Where to look for puddles:
- Rear-wheel-drive vehicles: puddles tend to appear near the center or rear of the vehicle, under the transmission tunnel.
- Front-wheel-drive vehicles: look toward the front-center of the car, just behind the engine.
- All-wheel-drive vehicles: puddles can appear at multiple points depending on which seal or line is leaking.
The location on your driveway shifts depending on where you park and how long the car sits, so use the cardboard test for a cleaner read.
Quick fluid identification guide:
- Transmission fluid: red to dark brown, slippery, thin, slightly sweet or burnt smell, found center to front of vehicle
- Engine oil: amber to dark brown, thicker and greasier, petroleum smell, usually found directly under the engine
- Coolant/antifreeze: green, orange, or pink, watery, sweet smell, often found near the front of the vehicle
- Brake fluid: clear to light yellow, thin, sharp chemical smell, found near wheels or firewall
- Power steering fluid: similar to transmission fluid in color and texture, but found near the front of the vehicle near the steering rack
The slipperiness test is useful: transmission fluid and power steering fluid both feel slick between your fingers, while engine oil feels heavier and greasier. Coolant feels almost watery by comparison.
The most common transmission leak points and why they fail
Most transmission fluid leaks trace back to a handful of specific components. Understanding which ones fail most often helps you have a smarter conversation with your mechanic and set realistic cost expectations.
- Transmission pan gasket: The pan sits at the bottom of the transmission and holds the fluid. The gasket sealing it to the case is made of rubber or cork, and it hardens and shrinks with heat cycles over time. A pan gasket leak typically shows up as a slow seep along the bottom edge of the pan, not a fast drip. Pan gasket failure and punctured pans from road debris are among the most common external leak sources.
- Transmission pan damage: Speed bumps, low-clearance driveways, and road debris can dent or crack the pan itself, causing a faster and more obvious leak.
- Cooler lines and fittings: These metal or rubber lines carry fluid between the transmission and the radiator-mounted cooler. They corrode, crack at fittings, or loosen over time. A cooler-line failure can also allow transmission fluid and coolant to mix, which is a severe failure requiring immediate service.
- Input and output shaft seals: These rubber seals sit where the driveshaft or axle connects to the transmission. Heat and mileage cause them to harden and crack, allowing fluid to seep out along the shaft.
- Axle seals: On front-wheel-drive and all-wheel-drive vehicles, the axle seals are a frequent leak point. Fluid here often gets flung across the undercarriage, making the source harder to pinpoint.
- Torque converter seal: The seal between the torque converter and the transmission bell housing can fail, often mimicking a rear main engine seal leak. This one requires a hoist and experienced eyes to diagnose correctly.
- Dipstick tube seal: A small but often overlooked source. The O-ring where the dipstick tube meets the transmission case can dry out and allow fluid to seep up and out.
- Case cracks: Less common but serious. Physical damage or severe overheating can crack the transmission housing itself.
Overfilling the transmission is another cause that owners sometimes create themselves. Too much fluid builds pressure that forces fluid past seals that would otherwise hold fine.
Pro Tip: Wipe the suspected area clean with a rag, then run the engine for 10 minutes and look again. A pan gasket seep will show as a thin, even film along the pan’s edge. A seal or case leak tends to show as a drip from a specific point higher up on the transmission body.
How mechanics diagnose leaks and what you can safely check at home
There’s a meaningful difference between what you can safely check yourself and what requires a professional. Here’s how to approach both.
What you can check at home:
- Park on level ground the night before and place white cardboard under the car to catch drips.
- Warm the engine for 5–10 minutes, then shift through the gears slowly before returning to Park.
- Locate the dipstick (if your vehicle has one). It’s usually marked with a red or pink handle. Pull it, wipe it clean, reinsert fully, pull again, and read the level against the MIN/MAX marks.
- Inspect the undercarriage with a flashlight for wet spots, fresh drips, or fluid trails along lines and seals.
- Note color and smell of any fluid you find.
What professionals do differently:
- Lift the vehicle on a hoist for a full undercarriage view at eye level
- Run the transmission to operating temperature before inspecting, since some leaks only appear under heat and pressure
- Apply UV dye to the fluid, then use a blacklight to trace the exact leak path, which is especially useful when gravity has routed fluid away from the actual source
- Clean the entire area, run the vehicle, then reinspect to confirm the true origin point
OEM technical guidance specifically warns that leaks are frequently misdiagnosed as pan gasket leaks when the actual source is a seal or line higher up. Cleaning and UV dye inspection before declaring a source is the professional standard for a reason.
One important limitation: many modern vehicles require specific operating temperatures or a hoist to check transmission fluid levels accurately. Some don’t have an owner-accessible dipstick at all. If your car falls into that category, skip the guesswork and call a pro. Overfilling from a bad read can create a new leak where none existed before.
Driving symptoms a transmission fluid leak causes and how problems progress
A transmission fluid leak doesn’t always announce itself with a visible puddle. Sometimes the first sign is how the car feels.
Symptoms to watch for:
- Delayed engagement: You shift into Drive or Reverse and there’s a pause of one to three seconds before the car moves. The transmission is struggling to build hydraulic pressure.
- Slipping: The engine revs but the car doesn’t accelerate proportionally. It feels like the transmission is momentarily losing its grip on the gear.
- Rough or erratic shifts: Shifts that feel harsh, clunky, or unpredictable instead of smooth.
- Whining or grinding noises: Low fluid causes metal components to run without adequate lubrication, producing sounds that range from a high-pitched whine to a grinding sensation.
- Burning smell: Fluid running low causes friction and heat. That burnt smell while driving is the transmission telling you it’s overheating.
- Limp-home mode: Many modern vehicles detect abnormal transmission behavior and lock the transmission into a single gear to protect it. If your car suddenly won’t shift above second or third gear, this is likely what’s happening.
These symptoms, combined with reddish-brown spots on the driveway and low dipstick readings, are the clearest indicators that a leak needs prompt attention to avoid major transmission damage.
The progression matters. A small seep from a pan gasket might take weeks or months to drop the fluid level enough to cause symptoms. But a cooler-line failure or a cracked seal can drain fluid in a single drive. Once slipping or overheating begins, internal clutch packs and bands start wearing at an accelerated rate. What started as a $200 gasket job can become a full rebuild if the warning signs are ignored.
One more thing worth knowing: internal leaks, where fluid bypasses internal seals inside the transmission without escaping the case, can produce all the same drivability symptoms without leaving a single drop on your driveway. If your car is shifting badly but the ground under it is dry, that’s still a transmission problem.
Is it safe to drive with a transmission fluid leak?
The honest answer is: it depends on the rate of loss and whether you have symptoms. Here’s a practical decision checklist.
- Small seep, no symptoms, fluid at normal level: You can drive short distances, but monitor the fluid level daily and get it inspected within a few days.
- Active drip forming a puddle after parking: Don’t drive it to a shop across town. Top off the fluid to a safe level and arrange an on-site inspection or a short, direct trip to a nearby mechanic.
- Any drivability symptom present (slipping, delayed engagement, rough shifts, burning smell): Stop driving. The transmission is already operating under stress, and continued driving accelerates internal wear rapidly.
- Fluid level critically low or unknown: Do not drive until the level is confirmed and corrected. Running a transmission dry even briefly can cause catastrophic damage.
The risk of driving with a leak isn’t just losing more fluid. Low fluid reduces hydraulic pressure throughout the system, which means clutch packs slip, heat builds, and the fluid that remains degrades faster from the elevated temperature. It’s a compounding problem.
Topping off the fluid is a legitimate short-term measure when the level is low and you need to move the vehicle a short distance to reach help. Use the correct fluid type specified in your owner’s manual. Mixing fluid types can cause foaming and pressure loss. But topping off is not a repair. It buys you time to get the actual leak fixed.
Pro Tip: Keep a quart of the correct transmission fluid in your trunk if your vehicle has a known seep. It’s cheap insurance for the moment you need to move the car safely.
Repair options, typical costs, and what each job involves
The cost of fixing a transmission fluid leak varies widely depending on where the leak originates. Here’s a realistic breakdown.
A few important notes on these numbers. Costs vary by vehicle make and model, your location, and whether the shop charges flat-rate or hourly labor. Luxury vehicles and trucks with complex drivetrain layouts sit at the higher end of every range.
A small external leak that escalates to internal damage because it was left unaddressed can push repair costs from the low hundreds into the thousands quickly. The pan gasket job that costs $200 today becomes a $2,500 rebuild if the transmission overheats repeatedly while the leak is ignored.
What to ask before authorizing any repair:
- Has the leak source been confirmed, or is this a best-guess repair?
- Is there any sign of internal damage (burnt fluid, metal particles in the pan)?
- Will this repair address the leak completely, or are there secondary leak points?
If the mechanic finds burnt fluid or metal shavings in the pan during a gasket replacement, the conversation about repair scope needs to expand immediately.
Temporary fixes and their real limitations
Stop-leak additives are sold at every auto parts store, and they work in a very narrow set of circumstances. Understanding that narrow window keeps you from making the problem worse.
What’s reasonable and what isn’t:
- Topping off fluid to a safe level: Reasonable as a short-term measure to move the vehicle safely. Use the correct fluid type only.
- Stop-leak additives for minor rubber seal seepage: These products can temporarily swell aging rubber seals and reduce minor seepage. They are not a repair.
- Stop-leak additives for mechanical failures: Cracked pans, corroded cooler lines, failed hard seals, and any leak involving metal-to-metal failure will not respond to an additive. Using one delays the real fix and can contaminate the fluid.
- Overfilling to compensate for loss: Never do this. Excess fluid gets forced past seals and creates new leaks.
Stop-leak additives may reduce minor seepage from aging rubber seals but do not repair mechanical damage and do not fix structural leaks. like cracked pans, corroded cooler lines, or failed hard seals.
A temporary sealer is acceptable when you need to drive a short distance to reach a mechanic and the leak is minor with no drivability symptoms. It is not acceptable when the transmission is slipping, the fluid is dropping fast, or you’re trying to avoid a repair indefinitely.
Pro Tip: Some transmission additives are incompatible with certain fluid types, particularly CVT fluid and dual-clutch transmission fluid. Adding the wrong product can cause foaming, pressure loss, and shift problems that didn’t exist before. Check the label carefully, and when in doubt, skip the additive and call a mechanic instead.
How to reduce the risk of transmission leaks
Most transmission leaks are preventable with consistent maintenance. Here’s what actually makes a difference.
Maintenance checklist:
- Check transmission fluid color and level every 3–6 months on vehicles with accessible dipsticks
- Follow the manufacturer’s recommended fluid change interval (commonly every 30,000–60,000 miles for conventional fluid, longer for synthetic, but always verify with your owner’s manual)
- Inspect cooler lines visually after any significant undercarriage impact
- Watch for early seepage around the pan edge or along axle shafts during oil changes
- Use only the fluid type specified for your vehicle. Wrong fluid causes seal degradation over time.
| Maintenance Task | General Interval | Notes |
|---|---|---|
| Fluid level check | Every 3–6 months | Only if dipstick-accessible |
| Fluid change/flush | 30,000–60,000 miles | Verify with owner’s manual |
| Cooler line inspection | After any impact; annually | Look for corrosion at fittings |
| Pan and gasket inspection | At every fluid service | Check for seepage at pan edges |
For urban drivers in Los Angeles specifically, low-clearance driveways, steep parking garage ramps, and speed bumps are the most common causes of pan damage. Approach steep transitions at an angle when possible to reduce the chance of the pan making contact with the pavement.
When you do notice a small drip, document it. Take a dated photo of the puddle and note the fluid color. That record helps a mechanic understand how long the leak has been active and how fast it’s progressing, which directly affects the repair recommendation.
Signs the leak has become internal transmission damage
There’s a point where a leak stops being an external repair problem and becomes an internal transmission problem. Recognizing that line early saves money.
Warning signs of internal damage:
- Slipping persists after the external leak has been repaired and fluid restored to the correct level
- Burnt fluid smell that doesn’t go away after a fluid change
- Metal shavings or debris visible on the drain plug or in the pan during service
- Repeated overheating indicated by warning lights or symptoms returning quickly after repair
- Consistent limp-home mode that returns after the vehicle is reset
Signs you should stop driving immediately and arrange a tow:
- The transmission cannot hold a gear at all
- You’ve lost forward drive, reverse, or both
- Fluid level drops to critically low within a short drive after being topped off
- Any combination of slipping, burning smell, and grinding noise occurring simultaneously
When internal damage is confirmed, the repair decision shifts to a cost-versus-replacement analysis. A transmission rebuild on a high-mileage vehicle may cost more than the car’s market value. A newer vehicle with an otherwise solid condition often justifies the rebuild cost. That’s a conversation worth having with a mechanic before authorizing any major work.
Prompt inspection and repair of external leaks is consistently the most cost-effective path. The difference between catching a pan gasket leak early and letting it run until the transmission slips can be several thousand dollars.
When to call a professional and how a mobile mechanic can help
Some transmission leak checks genuinely require a hoist, UV dye, and a trained eye. Others, like a pan gasket replacement or a cooler-line repair, can be completed on-site without ever moving the vehicle to a shop.
What a professional inspection covers:
- Visual leak tracing from above and below the vehicle
- UV dye injection and blacklight inspection to confirm the exact leak source
- Fluid level check under correct temperature and operating conditions
- Pan gasket and cooler-line repairs that can be completed on-site
- Assessment of whether the leak has caused internal damage requiring shop-level work
Advantages of mobile service for transmission leaks:
- No towing required for external leaks that can be diagnosed and repaired on-site
- Diagnosis happens at your location, which means no driving a leaking vehicle across town
- Upfront pricing before any work begins, so you know the cost before authorizing the repair
- Faster turnaround for common repairs like pan gaskets and cooler lines
Onsite Los Angeles Mobile Mechanic handles transmission leak inspections, fluid level checks, pan gasket replacements, and cooler-line repairs throughout the greater Los Angeles area. For jobs that require a hoist or internal transmission work, the team will tell you directly and help coordinate the next step rather than attempt a repair that needs shop equipment.
When to tow instead of drive:
- Active slipping or loss of gear engagement
- Fluid level critically low with no safe way to top off
- Burning smell or smoke from the transmission area
- Any combination of symptoms suggesting internal damage
Pro Tip: When you call a mobile mechanic, describe the puddle color, where it appears under the car, and any drivability symptoms you’ve noticed. That information alone often narrows the likely leak source before the mechanic arrives, which speeds up the diagnosis.
What most car owners get wrong about transmission leaks
The most common mistake is the wait-and-see approach. A small drip on the driveway gets noticed, mentally filed as “something to deal with later,” and then forgotten until the transmission starts slipping. By that point, what was a straightforward external repair has often become something much more expensive.
The second mistake is fluid misidentification. Engine oil and transmission fluid look similar when both are dark and degraded. Owners who assume the drip is just an oil leak sometimes skip the transmission fluid check entirely, and the transmission runs low for weeks without anyone realizing it.
Over-reliance on stop-leak additives is the third pattern worth calling out. These products are marketed aggressively, and the packaging often implies they’re a real fix. They’re not. For a minor rubber seal seep on an older vehicle, they might buy a few weeks. For anything mechanical, they buy nothing except a delay in getting the actual problem diagnosed.
When you call a mechanic, the most useful information you can give them is: the color of the fluid, where on the driveway the puddle appears, how long you’ve noticed it, and whether the car is driving differently. A photo of the puddle next to something for scale, and a photo of the dipstick reading if accessible, will cut the diagnostic conversation in half.
Get your transmission leak diagnosed on-site in Los Angeles
A transmission fluid leak doesn’t get better on its own, and driving on low fluid turns a manageable repair into a costly one fast. Onsite Los Angeles Mobile Mechanic comes to your home, office, or wherever the car is parked across the greater Los Angeles area, so you don’t have to tow a leaking vehicle or sit in a waiting room.

The on-site services cover transmission leak inspections, UV dye diagnosis, fluid level checks, pan gasket replacements, and cooler-line repairs, all with upfront pricing before any work begins. For jobs that require a shop hoist or internal transmission work, you’ll get a straight answer about what’s needed and what it will cost, not a runaround. Call 213-583-4159 to book an inspection at your location. No app needed, no towing required for most external leaks.
Sources
The following sources informed the diagnostic steps, symptom descriptions, and repair guidance in this guide.
- Leaking Transmission Fluid? 3 Sure-fire Signs | AAA Club Alliance
- How to check and maintain your transmission fluid | AAA
- Transmission fluid leak: Causes, warning signs, and repair cost – Monster Transmission
- How to Tell if Your Vehicle is Leaking Transmission Fluid | Fel-Pro
- Technical bulletin (OEM) — Leak inspection and common misdiagnoses (OEMDT C PDF)